Sea Turtle Finglerless Gloves

 Fingerless gloves are the ultimate versatile knitted accessory. These have a darling lacy cuff and are built from the cuff to the fingers. This pattern is very clearly written, but requires some experience.


This is a 2-page PDF pattern. $4.00 USD
The pattern will be emailed to you within 24 hours of payment.

 Skill Level: Rookie-Apprentice-Virtuoso-Genius

Skills: knit, yo, psso, increase

Sizes: adult small

Yarn: 50 g, 137 yds (125 m) worsted weight merino wool

Suggested Brands: Laines du Nord Giunco; Cascade 220 wool

Needles: 4 mm dpns

Other materials: stitch holders, tapestry needle or teeny crochet hook

Langstaff Road Hat

This pattern is a twist on the traditional basketweave stitch. It knits up quickly and makes a perfect unisex hat. It is simple enough to knit up, but has enough patterning to keep you interested. The stitch is easily memorized and Malabrigo Twist knits up like a dream.
Craft: knitting
Skill Level: Rookie-Apprentice-Virtuoso-Genius
Skills: knit, purl, ktbl, cast on, K2tog

Sizes: adult medium
Finished Measurements: fits approx. 22″ head circumference with instructions to adjust

Gauge: 22 sts and 30 rows = 4″ on 5 mm in patt (20 sts = 4″ on 5 mm needle as given on Malabrigo Twist ball band)
Yarn: 100g,150 yds (137 m) worsted-aran weight merino yarn
Suggested Brand: 1 skein Malabrigo Twist (shown in colour Azul Profundo)

Needles: 4 mm 16″ circular; 5 mm 16″ circular; 5 mm dpns
Other Materials: tapestry needle or teeny crochet hook

Instructions:

Starting at the bottom, with smaller circulars, cast on 100 stitches (or a multiple of 10 that is also divisible by 4; ex. 80 sts) with long-tail method. Pm for beg of rnd. Join in rnd being careful not to twist sts.

Work K2 P2 rib for 10 rnds. Brim should measure approx. 1.5″ from CO.

Change to larger needles and begin 12 row pattern.

Pattern:

Rnd 1: *K5, (K1tbl, P1) twice, K1tbl*, rep from * to * to end of rnd.
Rnd 2: *P5, (K1tbl, P1) twice, K1tbl*, rep from * to * to end of rnd.
Rep these two rnds twice more.
Rnd 7: *(K1tbl, P1) twice, K1tbl, K5*, rep from * to * to end of rnd.
Rnd 8: *(K1tbl, P1) twice, K1tbl, P5*, rep from * to * to end of rnd.
Rep these two rnds twice more.

Rep Rnds 1-12 once more and then rows 1-6 once.
Hat should measure approx. 5.5″ from cast on. (Continue working in patt until hat is desired depth. Dec Rnds can be started at any point in the patt.)

Dec Rnds:
Continue working in pattern, preferably beginning decs on a Rnd 1.
Change to dpns when sts become too tight on circs.

Rnd 1: *work 8 sts in patt, K2tog* rep from * to * to end of rnd.
Rnd 2 (and all even rnds): work even in patt (always knit your dec sts when you come to them)
Rnd 3: *work 7 sts in patt, K2tog* rep from * to * to end of rnd.

Rnd 5: *work 6 sts in patt, K2tog* rep from * to * to end of rnd.
Rnd 7: *work 5 sts in patt, K2tog* rep from * to * to end of rnd.
Rnd 9: *work 4 sts in patt, K2tog* rep from * to * to end of rnd.
Rnd 11: *work 3 sts in patt, K2tog* rep from * to * to end of rnd.
Rnd 13: *work 2 sts in patt, K2tog* rep from * to * to end of rnd.
Rnd 15: *work 1 sts in patt, K2tog* rep from * to * to end of rnd. 20 sts.
Rnd 16: K2tog around.10 sts.

Cut yarn. Weave in ends.

Classic Granny Square Blanket

Here is a classic throwback from the 1970’s that everyone loves. It crochets up quickly, making it great for gift-giving. This blanket is lightweight and reversibile – perfect for babies or adults! This pattern is suitable for beginners and includes tips on seamless colour changing.

Craft: crochet
Skill Level: Rookie-Apprentice-Virtuoso-Genius
Skills: ch, dc

Sizes: one size (adjustable)
Finished Measurements: approx. 35″ square

Gauge: not crucial
Yarn: 5 x 100 g, 241 yds (220 m) worsted weight yarn
Suggested Brand: 5 balls Paton’s Canadiana worsted acrylic or medium weight stash yarn

Needles: 5 mm hook
Other Materials: teeny crochet hook or tapestry needle
Instructions:

Alternate colours every rnd.

Make a slip knot. Ch 6. Join in a ring with a sl st.

Rnd 1: Ch 3 (first dc), 2 dc in sp (1 “square” made), *ch 3, 3 dc in same sp*, rep from * to * three times total (4 squares made); ch 3, insert hook into first ch 3 made at beg of rnd and YO with next colour, pull through. (Cut first colour.) Turn. (WS should now be facing you.)

Rnd 2: Ch 3 (first dc), 2 dc in sp, ch 3, 3 dc in same sp, *ch 1, 3 dc in sp, ch 3, 3 dc in same sp*, rep from * to * three times total (8 squares made), ch 1, sl st into first ch 3 (change colours as before). Turn.

Rnd 3: Ch 3 (first dc), 2 dcs in sp, *ch 1, 3 dcs in sp, ch 3, 3 dcs in same sp, ch 1, 3 dcs in next sp*, rep from * to * three times, end 3 dcs in sp, ch 3, 3 dcs in same sp, ch 1, sl st into first ch 3. Turn.

Rnd 4: You will make a 3 dc square + 1 ch in every sp across and two squares + 3 chs in every corner as foll:
Ch 3, 2 dcs in sp, ch 1, *3 dcs in next sp, ch 3, 3 dcs in same sp, ch 1, (3 dcs in next sp, ch 1) rep to corner, rep from * to * around finishing with a sl st into the first ch 3. Turn.

Rnd 5: Ch 3, 2 dcs in sp, ch 1, *(3 dcs in next sp, ch 1) rep to corner, 3 dcs in next sp, ch 3, 3 dcs in same sp, ch 1*, rep from * to * around finishing with a sl st in first ch 3. Turn.

Rep Rnd 5 until blanket is desired size or until you run out of yarn. End with a sl st into first ch 3 of last rnd worked, cut yarn and pull end through.
Weave in all ends.

Notes:
  • Make sure you are working two squares in every corner.
  • Don’t forget to turn your blanket at the end of every rnd – you should have a sp available to being your next rnd.
  • When changing colours, work the first two dcs of the first square over top of the strands for fewer strands to weave in at the end.

Easy As Pie Crochet Hat Recipe

Thesaurus.com
Main Entry: easy as pie

Synonyms: duck soup, easily done, easily managed, easy as can be, like falling off a log, like shooting fish in a barrel, like stealing candy from a baby, no sweat, simple as ABC.

Use this recipe to make an easy crocheted hat in any size (literally).

What you need:
  • Approx. 100 g, 220 yds (201 m) of almost any yarn. You might need more if you are using a very bulky yarn.
  • Hook to suit yarn – check your label or make a gauge swatch and see how you like the fabric (you don’t want it too dense or stiff, but not too loose or else it’s not very warm)
Mmmmm, pie.

Instructions:

Chain enough sts to fit around your head (or the recipient’s head). 
Now you get to count all those little guys!  

Your chs should be a multiple of 6 + 1. 

Make sure the string doesn’t fit too tightly – you should be able to comfortably fit a finger or two between your head and the string. This takes a little bit of intuition since wool has a little bit of ease whereas some fibres, like cotton, have no stretch or give.
Using a slip st, join your string in the rnd. Try not to twist your chs. 

Work a sc in every st around. 
Note: I usually like to insert my hook through both loops, depending on the project, but you should do what feels right for you.

Keep working in a spiral (just keep single crocheting, see Note below) until your hat measures approx. 4” for a baby, 4.5” for a child and 5” for an adult. (Use your judgement and instincts to find the right size – if you try your hat on, it should look like an oversized headband with the crown of your head just peeking out.)

Note: Usually, to work a crochet rnd, you would ch1 at the beg of each rnd and then sl st into that ch when you come back to the beginning to keep everything straight. Some people find this easier so that they can keep track of their rows – for a hat like this, though, I like to keep it simple. However you prefer to do it, just make sure you aren’t skipping chs and gradually making your hat smaller.

Decreases:
Use a scrap piece of yarn to mark the beg of the rnd. Slip it as you go.
Rnd 1: *work 5 scs, sk one st*, rep from * to * to end of rnd.
Rnd 2 (and all even rnds): work sc in each st around.
Rnd 3: *work 4 scs, sk one st*, rep from * to * to end of rnd.
Rnd 5: *work 3 scs, sk one st*, rep from * to * to end of rnd.
Rnd 7: *work 2 scs, sk one st*, rep from * to * to end of rnd.
Rnd 9: *work 1 scs, sk one st*, rep from * to * to end of rnd.

Rep Rnd 9 until you run out of sts. If it looks like your hat is getting too pointy at the top, omit the even numbered rnds from the last few inches of the hat.

Cut yarn and weave in ends.
Get Creative:
  • Add earflaps
  • Tassels (twisted or braided)
  •  Add a little brim
  • Trim (hold yarn double stranded and single crochet around the bottom)
  • Pom Poms!
  • Hold two strands together for entire hat (see photo, bulky weight wool with a variegated fingering weight)
  • Make patterns, designs or stripes by combining scs and dcs
  • Slouchy (make the body of you hat longer before you begin the decs)  

Check out: fakefoodonline.com….for some reason I find this really funny…in an amazing way. Can you believe that pie is fake? 

Nirvana Eye Pillow

This is a seamless pillow designed to help you relax and revitalize. Take a few minutes each day to meditate with your lavender pillow and you will notice a major difference in your mental health. Knitting it up will also help you relax as it’s all stockinette stitch, making it an ideal TV watching or a car riding project. It’s also quick and easy, making it a great last minute gift.

Craft: knitting
Skill Level: Rookie-Apprentice-Virtuoso-Genius
Skills: knit, grafting, provisional cast on

Sizes: one size
Finished Measurements: approx. 4.75″ wide and 9″ long (when full) lying flat

Gauge: 24 sts and 28 rows = 4″ in st st on 4 mm needles
Yarn: 50 g, 137 yds (125 m), DK weight yarn
Suggested Brand: 1 skein Noro Chirimen, 60% cotton, 24% silk, 16% wool, shown in colour 4

Needles: 4 mm dpns and medium size crochet hook (for provisional cast on)
Other Materials: tapestry needle or teeny crochet hook, scrap yarn (for provisional CO), fabric sack (best to sew it after your pouch is complete so you can match the size), 100 mL or grams lavender, 200 mL or grams buckwheat (recommended), wheat berries or beans

Instructions:

Note: If you don’t want to do the grafting, CO with backwards loop method (or whatever method you prefer) and cast off as you normally would. Sew up each end (after putting the lavender sack in!).

With dpns and scrap yarn, CO 50 sts with provisional method and divide evenly on needles. Join in the rnd being careful not to twist sts. Pm for beg of rnd.

With MC, knit in the rnd in st st until piece measures 9″ from CO (or desired length).

Divide your sts onto two needles and graft together (using the beg of the rnd as a starting point), leaving the CO edge open.

Make up your sack (sewn on three sides with one end open). The exact size isn’t crucial, but it should be slightly smaller than your knitted pillow.

Mix up your buckwheat and lavender in a container and place into your sack. Leave the dust in the bottom, though, you probably don’t want it in your eyes. Sew up the other end.

Place inside your knitted pillow and graft the open end shut (using the beg of the rnd as a starting point).


Be sure to devote at least 10 minutes a day to your mental health. Meditate, do some yoga, read, go for a walk or just have some quiet time to yourself.
 

For help with provisional cast on:
http://www.stitchdiva.com/custom.aspx?id=48

Abyss Legwarmers

Please note: I always test my patterns 100%, however, this one is NOT tested. I just don’t want to and it’s pretty easy anyway. As usual, let me know if you have any comments!


These legwarmers were designed specifically to wear under jeans. Their best feature is the ties that ensure they don’t slink down around your ankles. They are also cute in the summer with a skirt.
The originals were knit up with one skein of fingering weight and one skein of DK, however, they could be done with two skeins of fingering weight, if you prefer.


Craft: knitting
Skill Level:
Rookie-Apprentice-Virtuoso-Genius
Skills:
knit, purl, K2tog, yarn over, i-cord

Sizes: adult small (shown) and large
Finished Measurements:
approx. 5″ wide, 20″ long lying flat with cuff folded down (size small)

Gauge: 34 sts = 4″ on 2.5 mm as given on Anne ball band; 22 sts = 4″ on 4 mm as given on Soft Touch ball band
Yarn:
1 x 100 g (560 yds, 215 m) fingering weight yarn; 1 x 200 g (500 yds, 457 m) DK weight
Suggested Brand:
1 skein Anne by Schaefer Yarn; 2 skeins Shelridge Farms Soft Touch DK

Needles: 3 mm dpns (or 12” circular – dpns required for i-cord)  
Other Materials: tapestry needle or teeny crochet hook

Instructions:

Make two.

Starting at the top with DK yarn (MC), CO 80 (112) sts with long-tail method. Join in the rnd being careful not to twist sts. Pm for beg of rnd.

Work a K2, P2 rib for 10 rnds.

Rnd 11: *K2, P2, K2tog, YO, P2*, rep from * to * to end of rnd. 10 (14) eyelets.

Next: work 10 rnds in 2×2 rib.
Rnd 22: knit one rnd for fold line (shows as a purl rnd when cuff is turned down).

Rep the first 21 rnds once more.

Change to fingering yarn (CC) and st st. Use jogless stripe technique and carry strands up the back (unless you want to weave all those little guys in, but I don’t recommend it!)

Work 3 rnds with MC and 7 rnds with CC until legwarmers reach one inch from desired length. Obviously, you may choose a different stripe pattern (or a solid) based on your tastes and yarn choice.

Once your legwarmer is long enough, change to MC and work 12 rnds in 2×2  rib. BO in rib.

Finishing:

Fold top cuff over along purl line. Block if needed. Make a 30-inch i-cord on dpns and weave through eyelets, making sure they line up. Weave in ends.

Cockleshells Scarf

 This lightweight scarf is quite simple to make and knits up quickly. It is constructed of two halves knit from the bottom up and then grafted in the middle. The design evolved from the desire to get the most out of a luxury ball of lace weight yarn.
Craft: knitting
Skill Level: Rookie-Apprentice-Virtuoso-Genius
Skills: knit, purl, yarn over, K2tog, psso

Sizes: one size
Finished Measurements: approx. 5.5″ wide and 60″ long lying flat after blocking

Gauge: not crucial (32 sts = 4″ on 2.75 mm as given on Malabrigo ball band)
Yarn: 1 x 50 g, 300 yds (274 m) lace weight yarn
Suggested Brand: 1 skein Malabrigo lace; or 1 skein Jacques Cartier Qiviuk lace 2/14 shown in colour 4010

Needles: 3.5 mm straight or circular; 3.5 mm dpns (for grafting)
Other Materials: tapestry needle or teeny crochet hook

Instructions:
Make two halves. 
Note: The original scarf was designed without a border, so the edges curl in slightly…if you would prefer your scarf to sit flat at the edges, I would recommend working a 3-st garter edge (knit the first and last 3 sts of every odd and even row) or work a 4-st 1×1 rib at each edge (K1, P1 twice at the beginning and end of each row). I chose not to in this case simply because I find garter stitch to be a little bit abrasive, but it’s nice to have flat fabric!
CO 72 sts (or a multiple of 15 + 12).

Row 1 (and all odd rows): purl
Row 2: *K12, YO, Sl 1, K2tog, psso, YO*, rep from * to * to last 12 sts, K12.

Rep these two rows 9 times more; 20 rows total.

Rep Row 1 once more. Begin decreases:

Row 22: *K3tog tbl, K6, K3tog, YO, K3, YO*, rep from * to * to last 12 sts, K3tog tbl, K6, K3tog.
Row 23: purl
Row 24: *K3tog tbl, K2, K3tog, YO, K5, YO*, rep from * to * to last 8 sts, K3tog tbl, K2, K3tog.
Row 26: *K2tog tbl, K2tog, YO, K7, YO*, rep from * to * to last 4 sts, K2tog tbl, K2tog. 46 sts.
Row 28: K2tog tbl, *K9, K2tog*, rep from * to * to end. 41 sts.

Pattern:
Row 30: K9, *YO, Sl1, K2tog, psso, YO, K7*, rep from * to * to last 12 sts, YO, Sl1, K2tog, psso, YO, K9.
Row 31: purl

Rep these two rows for patt until scarf measures approx. 30″ or half of the desired length. Once you have completed both ends, place the pieces on dpns and graft together using Kitchener stitch. Weave in ends. Block lightly.

See link for grafting help: http://www.knitty.com/ISSUEsummer04/FEATtheresasum04.html

Wilted Warlock Hat

Here is a unisex slouch hat that is so easy-peasy and quick to knit that you’ll want to make five. Makes a great last-minute gift and has a scrumptious drape when knit up with a bulky alpaca.
Craft: knitting
Skill Level: Rookie-Apprentice-Virtuoso-Genius
Skills: knit, dec, colour change (optional)

Sizes: one size (fits adult size 21″-23″)
Finished Measurements: approx. 10″ tall and 10″ wide lying flat

Gauge: 16 sts and 22 rows = 4″ in st st on 6 mm
Yarn: 100g, 100 yds (91 m) bulky weight alpaca in MC; 25g, 25 yds (22 m) bulky weight stash yarn for CC
Suggested Brand: 1 skein Estelle Super Alpaca shown in 315; 0.5 skein Mirasol Sulka shown in 216

Needles: 6 mm 16″ circular, 6 mm dpns
Other Materials: tapestry needle or teeny crochet hook

 Instructions:

Note: This hat is kind of a blank slate…try it in a solid, striped or make up your own chart.

CO 80 sts in MC (or multiple of 8). Join in the rnd being careful not to twist sts. Pm for beg of rnd.

Knit in st st for 12 rnds or until piece measures 3″ from CO edge. Do not cut MC. Carry strands up the back unless you want to weave your ends in later.

Change to CC and knit 1 rnd.
Knit 1 rnd with MC.
Knit 2 rnds with CC.
Knit 1 rnd with MC.
Knit 3 rnds with CC.
Knit 1 rnd with MC.
Knit 4 rnds with CC.

Change to MC and knit in st st until piece measures approx. 10″ from CO edge (approx. 25 rnds from last stripe).

Dec Rnds:
Change to dpns when sts become too tight on circulars.

Rnd 1: *K6, K2tog*, rep from * to * to end of rnd.
Rnd 2 (and all even rnds): knit
Rnd 3: *K5, K2tog*, rep from * to * to end of rnd.
Rnd 5: *K4, K2tog*, rep from * to * to end of rnd.
Rnd 7: *K3, K2tog*, rep from * to * to end of rnd.
Rnd 9: *K2, K2tog*, rep from * to * to end of rnd.
Rnd 10: *K1, K2tog*, rep from * to * to end of rnd.
Rnd 11: K2tog to end of rnd.

Cut yarn and weave through rem sts. Weave in all ends.

Clothespin Sack

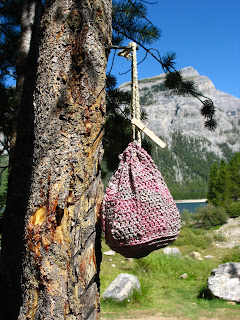
This is a very practical sack for all kinds of things, but I like to use mine for clothespins – a camping necessity! It is worked in one piece, with a round bottom, ribs around the body of the bag and a simple drawstring. Choose a durable fibre, like cotton or hemp.
Craft: crochet
Skill Level: Rookie-Apprentice-Virtuoso-Genius
Skills: ch, hdc, dc, fpdc
Finished Measurements: approx. 6″ from top to bottom (lying flat), 13″ circumference
Note: Mine holds about 50 traditional spring loaded clothespins.
Gauge: 18 sts x 9 rows = 4″ on 4 mm in patt (18 sts = 4″ on 4.5 mm needles as given on ball band)
Yarn: 75g, 142 yds (130 m) of something durable, dk weight; if you would like a larger sack, I would suggest a worsted weight cotton and a 5.5 mm hook
Suggested Brand: 1.5 balls Marina Mercerized cotton (discontinued)
Needles/Hooks: 4 mm hook
Other Materials: tapestry needle or teeny crochet hook
Instructions:
Note: Insert hook through back loops for bottom only and through both loops for the rest of the sack.
Starting with the bottom of the sack, ch 6.
Join in a ring with a sl st.
Pm for beg of rnd and slip it as you go along.
Note: I do not “join” my rnds at the end of each rnd for this project, I simply carry on with the next rnd – you may choose to join with a sl st and beg the next rnd with a ch 2.
Rnd 1: 12 hdc in ring.
Rnd 2: 2 hdc in each st around.
Rnd 3: *1 hdc in next st, 2 hdc in next st*, rep from * to * around.
Rnd 4: 1 hdc in each st around.
Rnd 5: rep Rnd 3.
Rnd 6: rep Rnd 4.
Rnd 7: *1 hdc in next 18 sts, 2 hdc in next st*, rep from * to * 2 more times (60 sts).
Body of Sack:
Rnd 1: sc in each st around, inserting hook through back loop as well as the st behind and below it (this creates a nice, durable edge on the bottom)
Rnd 2: inserting hook through both loops, *dc in next 5 sts, fpdc (front post double crochet) in next st*, rep from * to * around and around and around until your sack is one inch shorter than you would like the finished bag to be (for example shown, I worked 12 rows).
Next (eyelet rnd): *sk first sp, dc in next 3 sts, ch1, sk next st, fpdc in next st*, rep from * to * to beg of rnd (fpdcs should line up with previous ones worked).
Next: rep Rnd 2.
Cut yarn and finish with a sl st into next st to tie off. Weave in ends.
Finishing:
Make a ch string approx 26″ long and weave through eyelets. I tied a knot in the end of mine and then another a few inches down to make a loop for convenient hanging. 
A clothes dryer is one of the most energy intensive appliances in the house. Save money and cut out harmful CO2 emissions by drying your clothes outside in the fresh air!

River Rock Scarf

This pattern stitch makes a really nice, flat fabric that appears to be more woven than knitted. The rough edges combined with a neutral-toned variegated yarn gives it a natural look. Pattern includes instructions on how to substitute yarns.


Craft:
knitting
Skill Level: Rookie-Apprentice-Virtuoso-Genius
Skills: knit, purl, sl1

Finished Measurements: dependent on yarn

Gauge:
not important, instructions are written for almost any yarn
Yarn: approx. 200g of anything from sport weight to bulky weight
Note: sorry to be vague, but amount and yardage is dependent on the weight of yarn you choose – ask at your local yarn shop
Suggested Brand: your choice; I used a bulky weight wool for the example on this page or 4 balls of Noro Kureyon works well (seen on pg. 2)

Needles/Hooks: match to your yarn according to the label
Other Materials: tapestry needle or teeny crochet hook

 
Instructions:

CO 24 sts, or an even number.

Row 1 (RS): *K1, bring yarn forward, sl1 as is to purl*, rep from * to * to last two sts, K2.
Row 2 (WS): *P1, with yarn in back sl1 as if to purl*, rep from * to * to last 2 sts, P2.

Repeat these 2 rows until scarf reaches desired length. BO and weave in ends.

My advice for substituting yarn in a pattern is almost always the same: knit a gauge swatch that is at least 20 sts x 15 rows (depending on your yarn). The bigger your swatch is, the more accurate your measurements are going to be. Knit the swatch in the pattern stitch to be used.

Get a fine point knitting needle and count out how many sts you have in 2 or 4 inches (again, the bigger sample you are taking, the more accurate). I try to avoid counting the few sts at the edge of your fabric for accuracy. Also, you can’t cheat and only knit a few rows – you need to knit more than that to be accurate.

Now you just need to know how wide you would like your scarf to be. For example, did you count 20 sts = 4 inches? For a six inch scarf you would need 30 sts.

For fabulous tassel making instructions, check out my “Seaflower Scarf”, another free and easy scarf pattern.